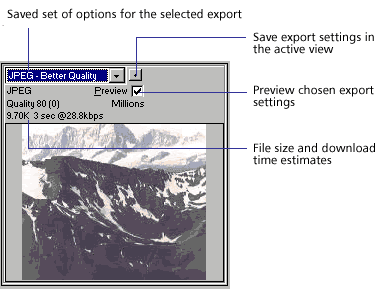
The preview area displays the graphic exactly as it will be exported and estimates file size and download time with the current export settings.

You can use split views to compare various settings to find the smallest file size that maintains an acceptable level of quality. You can also constrain the file size from the Export Preview using the Optimize to Size Wizard.
When exporting animated GIFs or JavaScript rollovers, the estimated file size is a total of all frames.
Note: To increase redraw speed of the Export Preview, deselect Preview. To stop the redraw of the preview area when changing settings, press Esc.
To preview optimization in the Export Preview dialog box:
| 1 | To zoom in or zoom out in the preview, choose the Magnify tool. Click to magnify the preview. Alt-click (Windows) or Option-click (Macintosh) to zoom out. |
| 2 | To pan the preview area, choose the Pointer tool and drag in a preview, or hold down the Spacebar and drag in a preview. |
| When multiple views are open, all previews are magnified to the same level and all previews pan simultaneously to display the same portion of the image. | |
| 3 | To compare optimization settings in the Export Preview, click a split-view button to divide the preview area into two or four previews.

|
| Each preview window can display a preview of the graphic with different export settings. | |
| 4 | To optimize a graphic based on a maximum file size, click the Export to Size button to open the Optimize to Size Wizard. Enter a file size.

|
| The Optimize to Size Wizard attempts to match the requested file size using these methods: | |
| Adjusting JPEG quality | |
| Modifying JPEG smoothing | |
| Altering the number of colors in 8-bit images | |
| Changing dither settings in 8-bit images | |
| Enabling or disabling optimization settings | |